In the previous post, I discussed about backup and restore of cloud disks on Alibaba Cloud. For illustration purpose, I used the aliyun command line interface, but then realized that I haven’t described how to get started with the CLI tool.
In this post, I will describe all the steps needed to properly setup and use the CLI.
Prerequisites
Before moving to the CLI topic, I will spend some time to talk about the Alibaba Cloud account and RAM service. After installation, you need to have a way to authenticate the tool. Alibaba Cloud provides many ways to do so, and the most basic way is to use an access key ID and secret generated from your root account or a RAM user account.
Alibaba Cloud account
The very first step of using Alibaba Cloud is to create an account. This is an easy process that you can complete in 5 minutes online. Currently, Alibaba Cloud has three different portals(sites) and a different account can be created on each portal. However, this does not mean that you have to create an account on each portal. You just need to be aware of the differences between each portal and choose the one that fits your needs:
- China portal: this is portal for Chinese users. All products documentation and console are in Chinese. The currency is RMB, which means all the bills will be in RMB as well. You’d have to meet some requirement that are local to China to be able to create and account here. For example, you need to have Chinese mobile phone number.
- International portal: for users living outside of China, this is the primary destination if you want to use Alibaba Cloud. Everything from product documentation to console is well localized in English, and the main currency is USD. All you’ll need to create an account here are a valid email address, mobile phone number and a valid payment method (either a credit card or paypal).
- Japan portal: this portal is a Japanese version of the international portal, and is intended for Japanese users. It is actually operated by SB Cloud(a joint venture between Alibaba and Softbank), but offers the same products and services as the international portal. JPY is the currency used here, so it is well suited for users living in Japan.
Before choosing to use a portal, you must note that the products offered on each portal are different. The China portal has the most products, but unless you understand Chinese, I don’t think you’d find your way around the console. The Japanese and international portals try to have the same product line up, although the latter currently has more products.
So before getting started, you need to create an account in either one of the portals. I will use my account created on the international portal for demonstration. If you don’t have an account already, just go to one of the portals and create one. The steps are straight forward so I won’t describe them here.
You can consider the Alibaba Cloud account as a root account. All the cloud resources that you create on the platform will be tied to this account, as well as your billing info. You must make sure not to share the credentials with anybody and keep it secure. You will use this account to login to the console, or generate an access key ID/secret pair to access your cloud resource from API or other tools like the CLI.
RAM user
RAM, which stands for Resource Access Management, is a service that allows you to create sub-accounts from your Alibaba Cloud account, and then manage the permissions for each sub-account. This makes a lot of sense to organizations, where many employees with different roles may access and operate on the infrastructure on the cloud. For individual users, it can serve to protect your root account. Unless necessary, make a habit of accessing your cloud resources with a RAM user. We will walk though how to generate an access key ID/secret pair for a RAM user in the next section.
Access Key ID/Secret pair
To operate from the API or CLI, you need a valid Access Key ID/Secret pair tied to your root account or RAM user. As mentioned earlier, it is better to use a RAM user. Let’s walk through how to generate the AK ID/Secret.
Root account
- Login to your Alibaba Cloud account and go to the console
- Click on the
AccessKeymenu theMy accountmenu
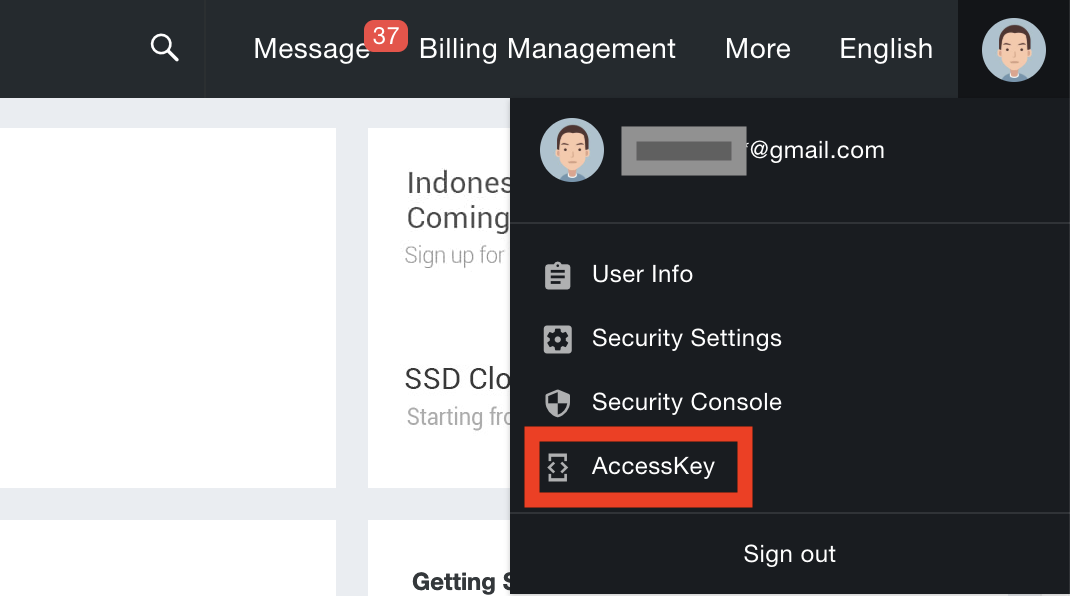
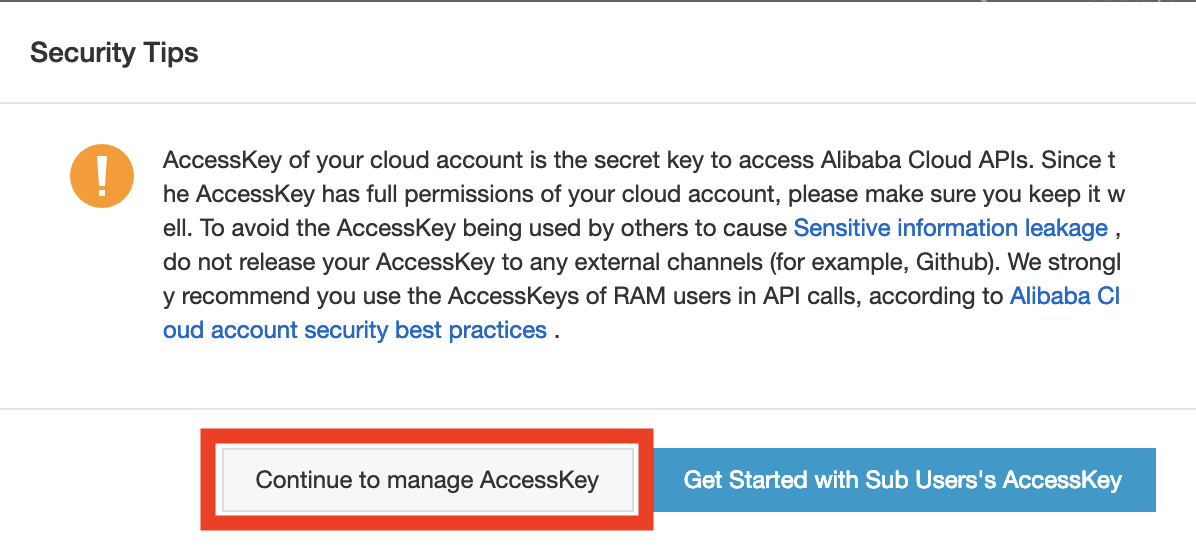
- Choose
Continue to manage AccessKeyfrom the popup
- In the “Security Manangement” page, click on
Create AccessKeyto create a pair of AK ID and secret.
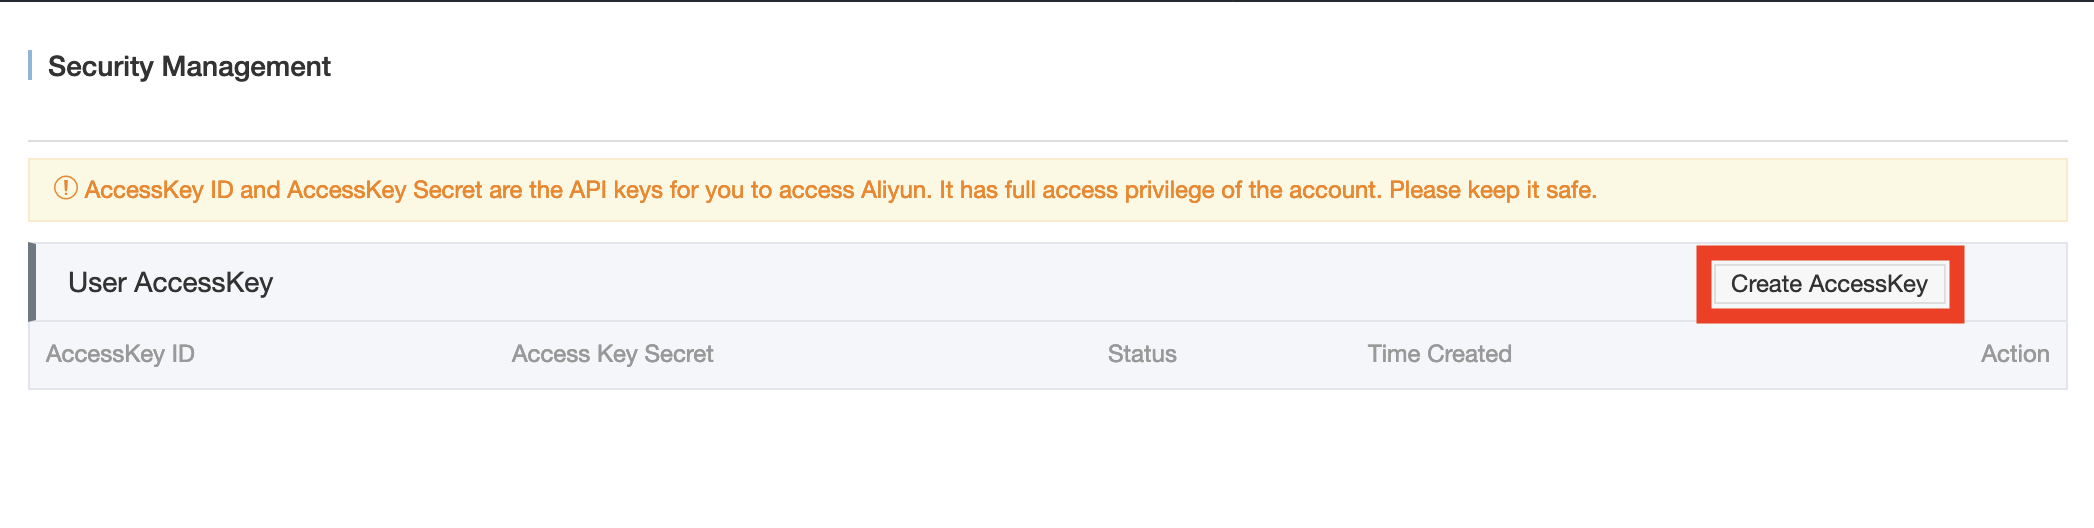
- That’s it. The pair is ready; you can click on
Save AccessKey informationin the popup to download the pair in a csv format.

RAM user
RAM has many features that will not be discussed in this post. For the purpose of using the CLI, I will just go through the most basic steps of creating a RAM user, granting it permissions and creating a AK ID/Secret pair for that user. You can refer to the RAM documentation for more information on this topic. I may post another article to go through the basics of RAM.
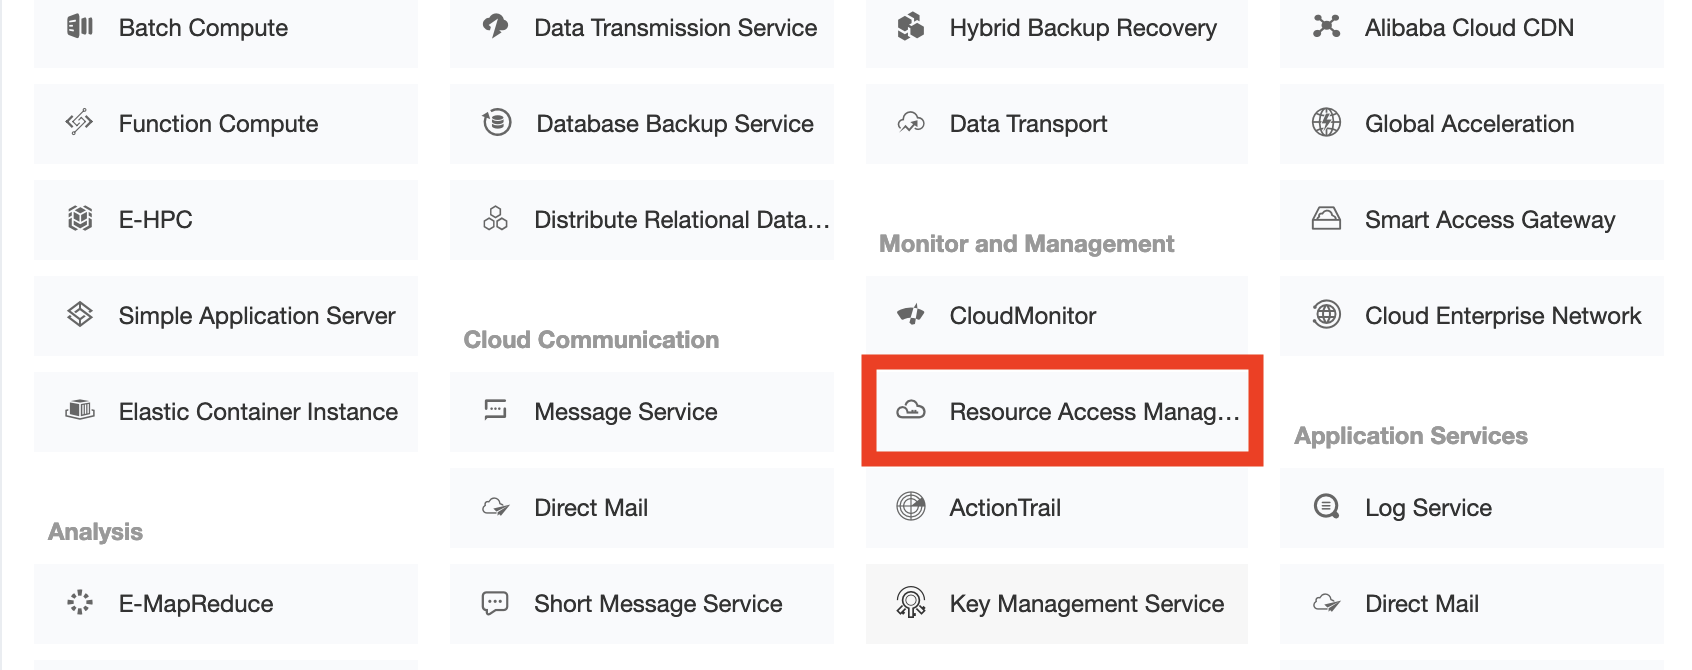
- Login to the Alibaba Cloud console top and access the RAM console
- In the RAM console, open the “USers” tab
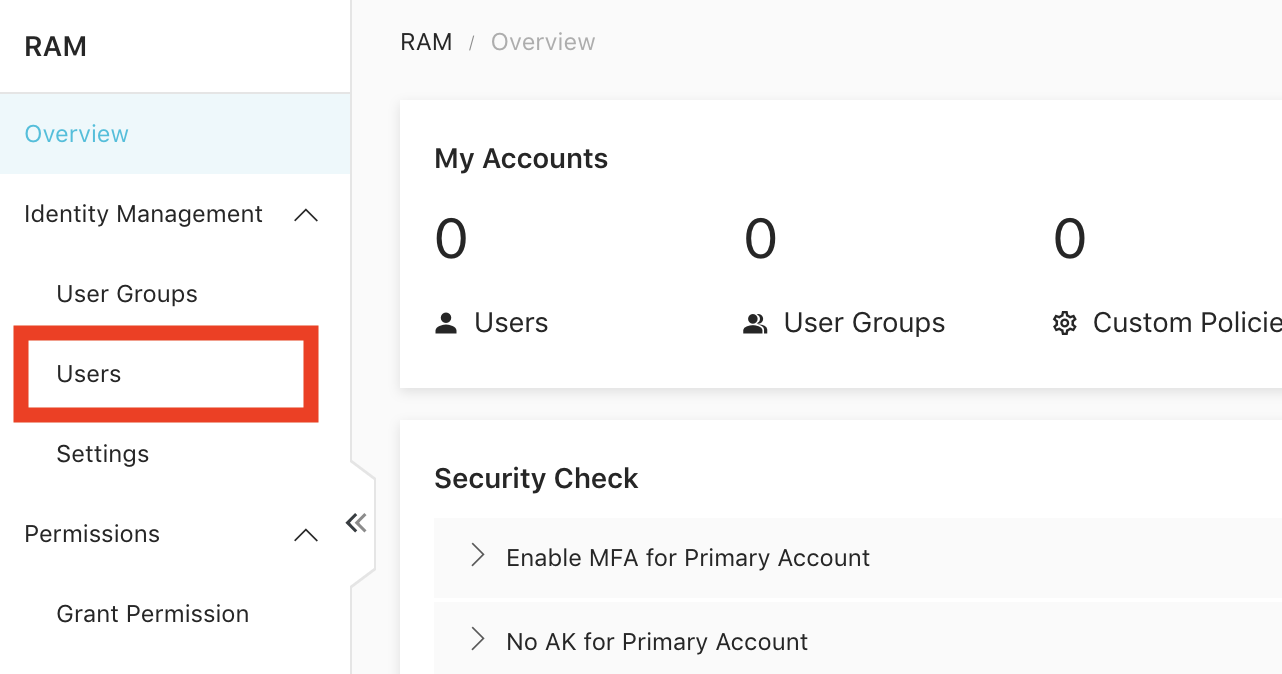
- In the “Users” page, click on
Create Userbutton to create a new RAM user
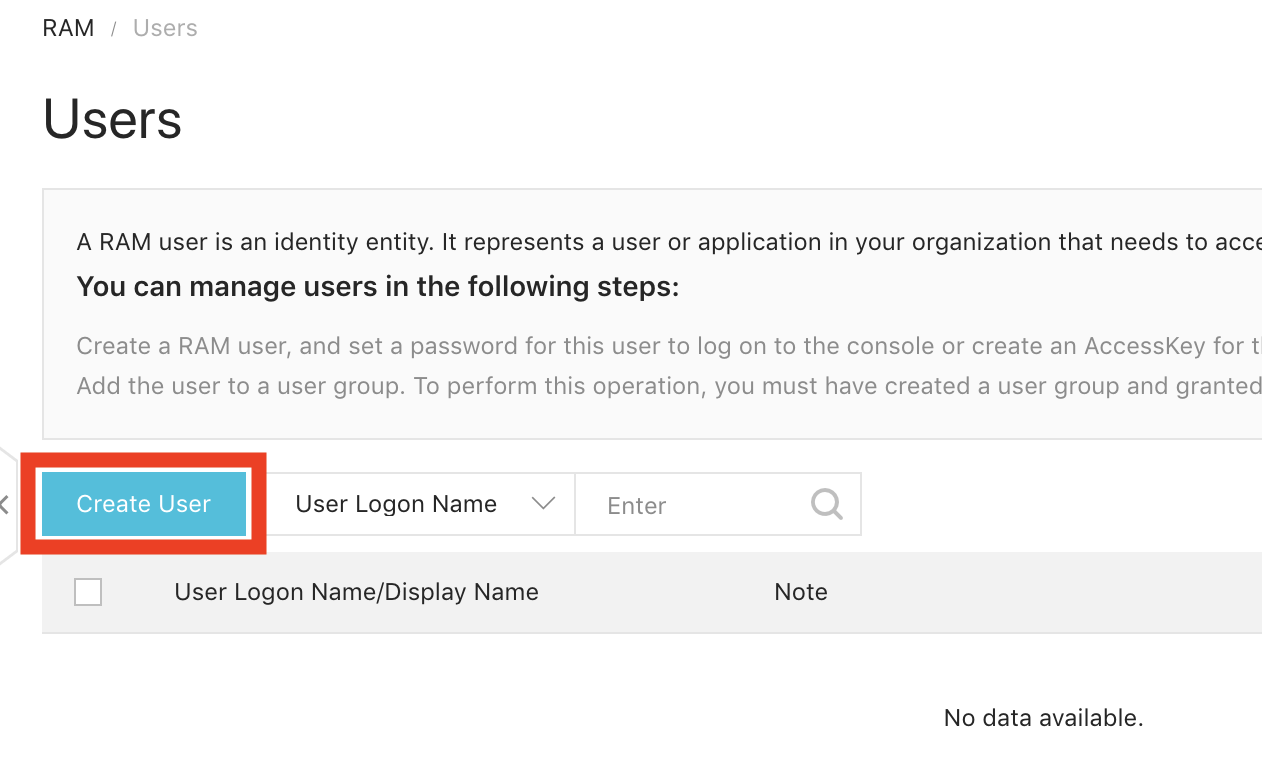
- In the “Create User” Menu, enter the logon name, display name and choose the
Programmatic Accesscheck box for the “Access mode”. Since we only want to use the CLI, it’s not necessary to enableConsole Password Logon.

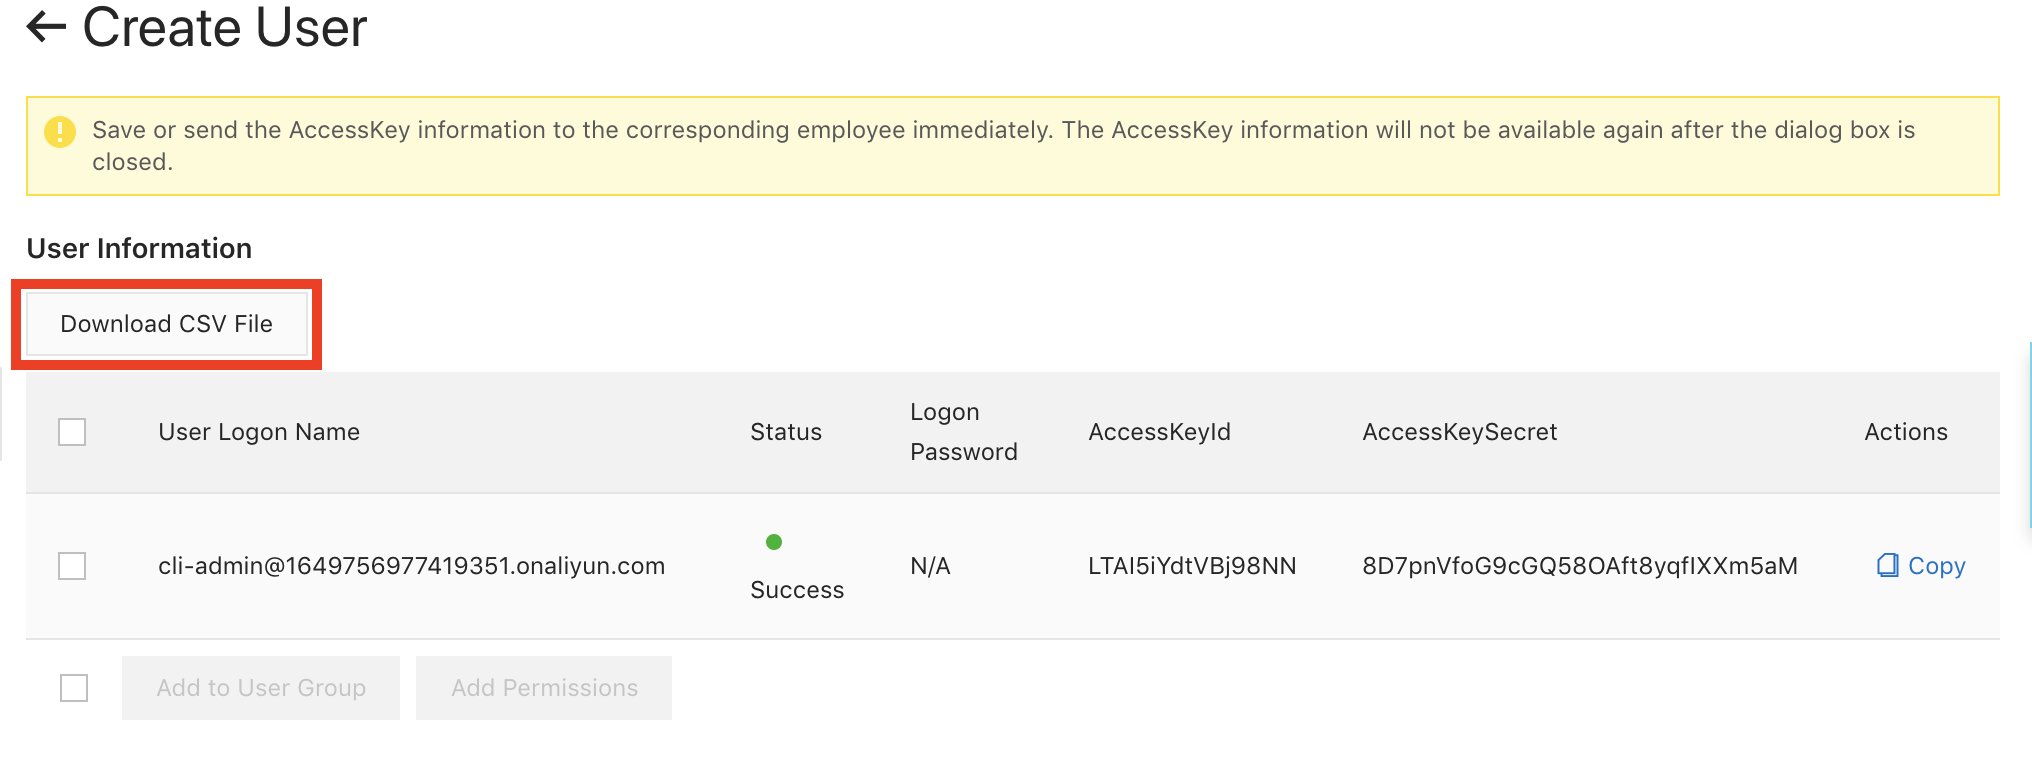
- You can see the newly created user information. Click on
Donwload CSV fileto donwload the AK ID and secret in a CSV. If you don’t copy or download those information at this stage, you won’t be able to obtain the secret of the newly create AK.
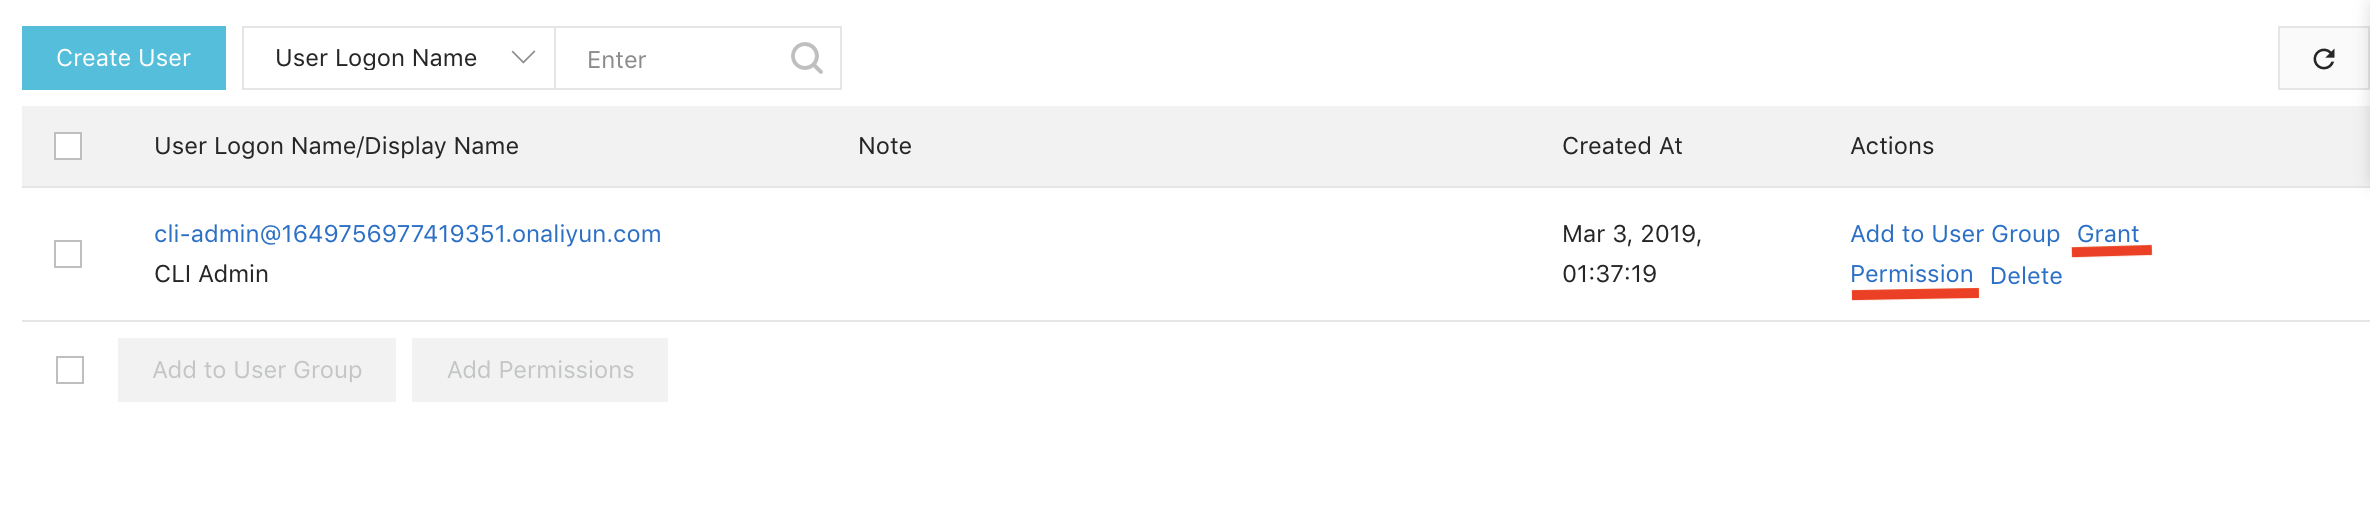
We do have the AK ID/secret of our RAM user. But since this user does not have any permission granted yet, you won’t be able to operate on your cloud resources with it. We need to grant a permission first. The following steps will grant root access to this RAM user. When granting permissions to RAM users, best practice is to grant the least powerful permission needed for that user.
- Return to the “Users” page to view the user list. On the record of our targer user, click on
Grant permisson
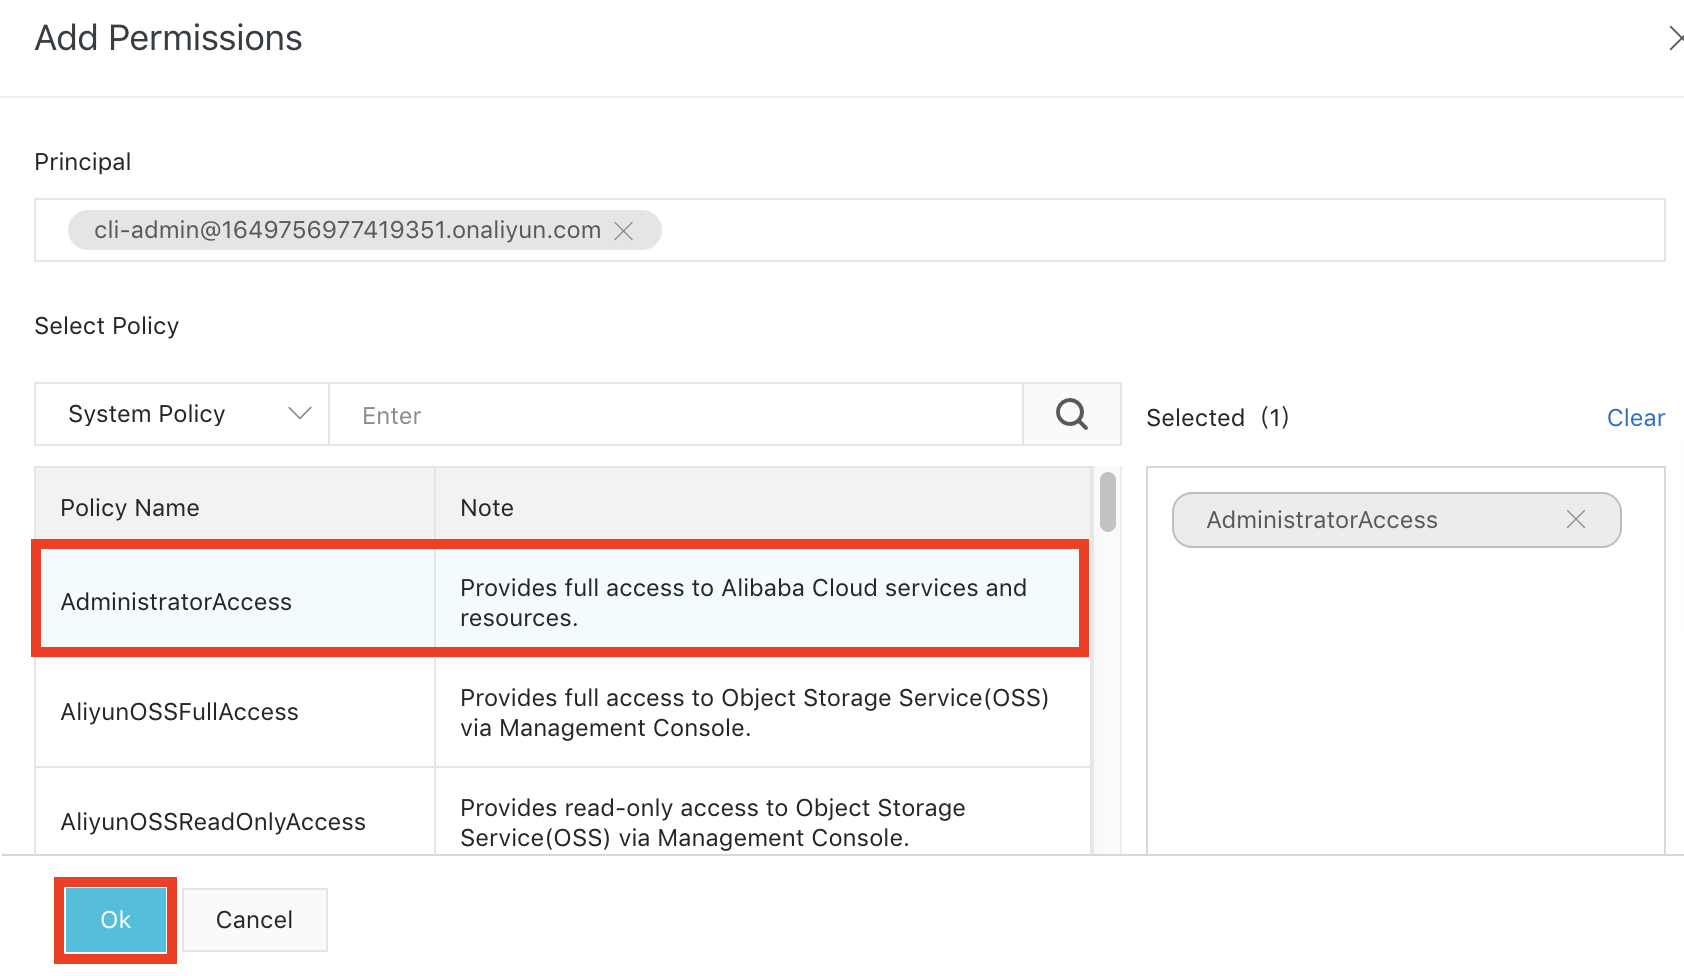
- In the “Add Permisson” page, select
AdministratorAccessand clickOK
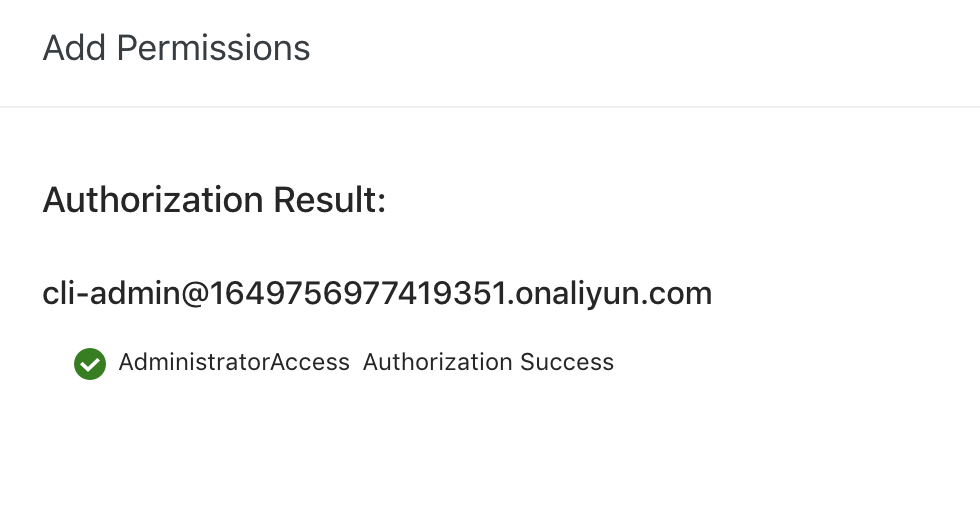
- Verify the success message and click
Finished
We are all set. I described the steps to obtain the AK ID/Secret pair for both the root account (Alibaba Cloud) account and the RAM user. However, I advise that you don’t create the AK of the root account at all, but rather use the RAM user.
Getting started with the aliyun CLI
We are finally back to our main topic, the CLI. I will describe the installation, initial setup, command line syntax and some basic tips to get started.
Installing aliyun
The aliyun CLI is built in go. You can either download the precompile executable, or compile from source.
Download executable
Go to the github repo and click on your platform to donwload
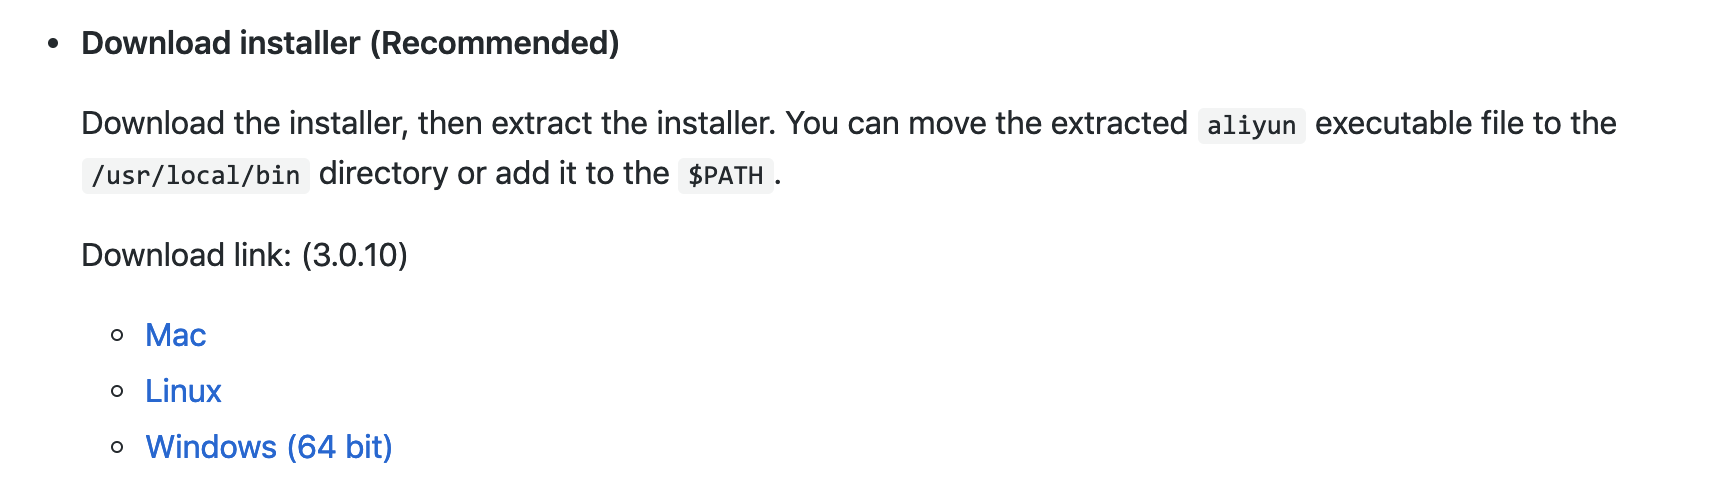
As stated here, it’s the recommended way to install. After downloading, unpack the file, go to the download directory and move the executable file into a directory in your path. On the linux or mac, /usr/local/bin is the recommended target.
Example on mac
$ sudo mv aliyun /usr/local/bin
You can test your installation by checking the version
$ aliyun version
3.0.10
Compile from source
Follow the steps in the github README. You need to configure go first.
$ mkdir -p $GOPATH/src/github.com/aliyun
$ cd $GOPATH/src/github.com/aliyun
$ git clone http://github.com/aliyun/aliyun-cli.git
$ git clone http://github.com/aliyun/aliyun-openapi-meta.git
$ cd aliyun-cli
$ make install
aliyun setup
Now that we have installed the too, we need to do one initial setup, which is configuring a profile. A profile consists of the user AK for authentication, default region and language. Region in this context is the Alibaba Cloud region for your cloud resources. We use the configure command to configure a new profile. Prepare your the AK information of the just created RAM user.
$ aliyun configure
Configuring profile '' in '' authenticate mode...
Access Key Id []: xxx
Access Key Secret []: xxx
Default Region Id []: ap-northeast-1
Default Output Format [json]: json (Only support json))
Default Language [zh|en] en: en
Saving profile[] ...Done.
Enter your Access Key Id/Secret(not shown here), default region and preferred language when prompted.
You can configure multiple profiles and give a name to each profile to separate them by using the -p flag:
$ aliyun configure -p root
The profile name will be root. When submitting commands, you can authenticate with the root profile name with the -p flag:
$ aliyun ecs DescribeInstances -p root
Listing instaces with the root profile.
You can also configure a provile in non-interactive mode with the configure set command:
$ aliyun configure set \
	-p admin \
	--mode AK \
	--access-key-id xxx \
	--access-key-secret xxx \
	--region ap-northeast-1 \
	--language en
Configuring a profile named admin.
You can delete a configured profile with the configure delete command:
$ aliyun configure delete -p root
Finally, you can view your configured profiles with the configure list command:
$ aliyun configure list
Profile   | Credential         | Valid   | Region           | Language
--------- | ------------------ | ------- | ---------------- | --------
default   | AK:***HnT          | Valid   | cn-hangzhou      |
admin *   | AK:***8NN          | Valid   | ap-northeast-1   | en
“*” Sign near the profile name means the active profile: If you don’t submit the -p flag to aliyun commands, this profile will be used.
aliyun command syntax
Type aliyun help to see the syntax:
$ aliyun help
Alibaba Cloud Command Line Interface Version 3.0.10

Usage:
  aliyun <product> <operation> [--parameter1 value1 --parameter2 value2 ...]
“product” means the Alibaba Cloud product you want to access from the CLI, and “operation” stands for the API your are trying to access. Example:
$ aliyun ecs DescribeInstances
Accessing the DescribeInstances API of the ecs product. You can view the list of products accessible from the CLI in the help with aliyun help, and also the list of APIs(operations) available for each product with aliyun <product> help.
Regarding the parameters, you can check the available parameters for each API with aliyun <product> <operation> help:
$ aliyun ecs AddTags help
Alibaba Cloud Command Line Interface Version 3.0.10

Product: Ecs (Elastic Compute Service)
Link:    https://help.aliyun.com/api/ecs/AddTags.html

Parameters:
  --RegionId     String  Required
  --ResourceId   String  Required
  --ResourceType String  Required
  --Tag.n.Key    String  Optional
  --Tag.n.Value  String  Optional
  --Tag.n.key    String  Optional
  --Tag.n.value  String  Optional
To actually get a full understanding of what the API(operation) does and the meaning of each parameter, you must consult the official API documentation. The help of the CLI only tells you how to use the CLI and does not provide any explanation of the API itself.
Referring to the previous post about backups, here is a full exmaple of using the CLI:
$ aliyun ecs CreateAutoSnapshotPolicy \
	--regionId ap-northeast-1 \
	--repeatWeekdays '["1", "2", "3", "4", "5", "6", "7"]' \
	--timePoints '["0"]' \
	--retentionDays 30 \
	--autoSnapshotPolicyName dailybackup
You can see that we follow the syntax described above with the product:ecs, operation:CreateAutoSnapshotPolicy followed by multiple parameters.
Tips: Modifying the output
The default output format of aliyun is json. Unless you want to use the json output as an input to another program, you may sometimes want to see the results in a more human readable way. The --output flag helps us do that: it can select only the values that you are interested in, and in addition display them as a table. The parameter to this flag should have the format cols=item1,item2 where item1 and item2 are the json fields that you want to select. Example:
$ aliyun ecs DescribeInstances \
	--InstanceIds '["i-6we7nc6j9lm4iz6pypmh"]' \
	--output cols=HostName,InstanceId,Status
DescribeInstances would normally dispaly a very long json string with many many fields. In the above command, we are selecting only the fields that interest us: HostName, InstanceId and Status. The result looks like this:
HostName        | InstanceId             | Status
--------        | ----------             | ------
ebsarr-ecs-test | i-6we7nc6j9lm4iz6pypmh | Stopped
That’s it for today. With the information provided in this post, I hope everyone can have a basic undertanding of Alibaba Cloud portals, accounts/RAM users and get started with the CLI.
ではでは、おやすみなさい(あ、夜は今だけか。。。)